


Do you want to record a payment received at the time of the sale of your products or services? A sales receipt form is what you would use to capture the cash transaction in QuickBooks Online.
I will be using the sample company file called Mary's Nonprofit in this tutorial.
Log into your QuickBooks Online account and follow the below steps to get started.
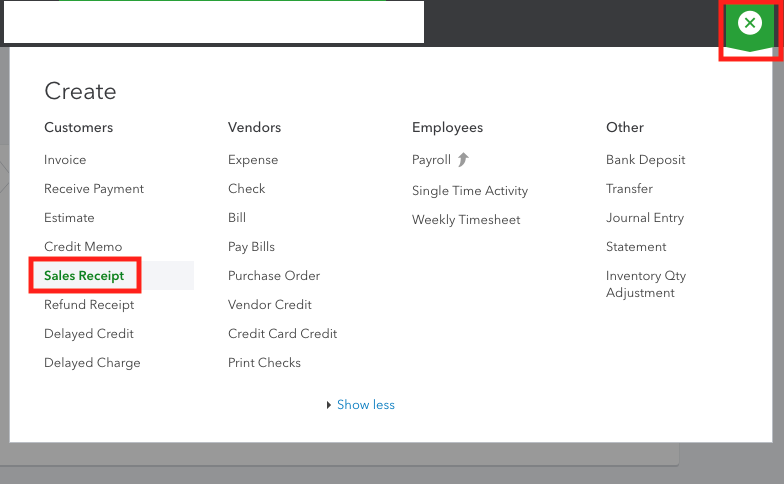
Click on the "+" icon in the top right navigation bar. Under the Customers column, click on Sales Receipt.
QuickBooks Online will open up the Sales Receipt screen. Complete the following fields:
Select an existing customer or create a new one
The email field should auto-populate with the customer's email address if it exists in the system. Or you can manually enter it in this screen
Enter any custom field info
Select the sales receipt date
Enter the payment method
Enter the reference number (this can be a check number, online code, etc)
Leave the deposit to account as Undeposited Funds
Select your product/service items from the dropdown list
Enter the purpose of the payment in the description field
Enter the quantity and price
If you have class tracking turned on, you can assign a class to the line item in this screen
If you collect sales tax, you can check off the tax box
The message displayed on sales receipt - thank your customer for payment
Review your total amounts to make sure everything is accurate
Once you finish adding all the sales receipt details, you can click the print or preview option to display the sales receipt in PDF mode or select print later if you want to print a copy later.
You can make the sales receipt recurring if you tend to receive payments from the same customer frequently on the same date. Check out my prior blog post on how to create recurring transactions in QuickBooks Online.
You can customize the look of the sales receipt form and the email message the customer should receive.
The more button gives you more options to duplicate the sales receipt, review the transaction journal or delete the sales receipt if you made a mistake.
To finish creating the sales receipt and exit out of the screen, do any of the following:
Click save and send to save and email the customer a copy of the receipt
Click save and close if you just want to save the receipt without emailing it to the customer
Click save and new to keep adding more sales receipts
You are done creating the sales receipt. Check out the next blog on how to move the funds from the Undeposited Funds account into your bank account using the Bank Deposit function in QuickBooks Online.
Feel free to share this QuickBooks Online tip with other users. Reach out to me if you need a one-on-one QuickBooks Online training session.


